
2.2 Configure and verify interswitch connectivity
2.2.a Trunk ports
2.2.b 802.1Q
2.2.c Native VLAN
What if we have a large network with multiple switches? We want to connect the switches together. We choose a port on switch one, and a port on switch two, and connect them with a patch cable. On each switch, these ports are known as Trunk ports.
A Trunk port carries traffic for multiple VLANs. Each frame is tagged with its VLAN while being transferred between trunk ports.
Other ports are known as Access ports. An Access port belongs to a single VLAN. We need access ports because devices such as computers can’t tag their own data with a VLAN (and if they could it would be a major security risk because a rogue device can change the VLAN that it’s on)
The switch assumes that traffic passing through an access port belongs to the VLAN assigned to the port. The standard for VLANs is called 802.1Q – it allows switches from different manufacturers to understand each other’s VLANs.
The Cisco standard is called Inter-Switch Link (ISL), but it is not popular. Let’s take another look at the Ethernet header

With 802.1Q, between the source and type, we add a Tag field, which contains additional fields
- Type
- Priority
- Flag
- VLAN ID
The VLAN IDs range from 1 to 4096. VLAN 1 is the default VLAN that comes with every switch. VLANs 1002, 1003, 1004, and 1005 cannot be used or deleted, but nobody knows why.
When we pass traffic over a trunk port, we must tag it with a VLAN ID so that the other switch knows which VLAN it belongs to and can send it to the correct destination. An access port does not tag frames with VLANs.
Each trunk port can be configured to transfer data for one or more VLANs. We don’t have to transfer data for all the VLANs on every trunk port. For example, we might have VLANs 1, 2, 3, and 4 on our switch. If we set Port 48 to be our trunk port, we might choose to transfer only VLANs 1 and 2 over it. We might also set Port 47 as a trunk port and choose to transfer only VLANs 3 and 4 over it.
Every trunk port must have one VLAN called the native VLAN. Data travelling over the native VLAN is not tagged. The native VLAN must be the same on all switches that connect to each other. We need a native VLAN in case we connect a switch to another switch that doesn’t understand VLANs – the switch that doesn’t understand VLANs will not tag any data but will transfer it.
This brings us to our next point: Tagging and Untagging ports. An access port is known as an untagging port or untagged port, because it strips the VLAN tags off any traffic it receives and because traffic passes through the port untagged. A trunk port is known as a tagging port or a tagged port, because it adds VLAN tags to any traffic it receives, and because traffic passes through the port tagged. The receiving switch removes the tag.
If I didn’t have a trunk port, I would need to connect a cable from each VLAN to each switch.
For example, if I have two 48 port switches, and I created the following VLANs on each switch
- Ports 1 through 12 are on VLAN 1
- Ports 13 through 24 are on VLAN 2
- Ports 25 through 36 are on VLAN 3
- Ports 37 through 48 are on VLAN 4
I would need four cables to connect the VLANs. Maybe I connect the following
- Port 1 on Switch 1 to Port 1 on Switch 2 transfers VLAN 1 data
- Port 13 on Switch 1 to Port 13 on Switch 2 transfers VLAN 2 data
- Port 25 on Switch 1 to Port 25 on Switch 2 transfers VLAN 3 data
- Port 37 on Switch 1 to Port 37 on Switch 2 transfers VLAN 4 data
This wastes eight ports. If I have more than four VLANs, it would waste even more ports. But if I configure Port 48 on each switch as a trunk port, I can transfer all the VLAN data over it.
Access ports on a Cisco switch can be configured with two VLANs. Why? In a large organization using VoIP, the VoIP phones are connected on one VLAN and the computers are connected on another VLAN. In many cases, a user connects a VoIP phone to a switch and a computer to the VoIP phone. This is known as IP Passthrough because the phone passes the computer’s traffic through to the switch. The main advantage is that the organization only requires one physical cable per user. The Cisco switch knows how to separate VoIP and user traffic.
Before we connect switches, we need to make sure that the same VLANs are configured on all the switches and that they are correct.
For example
- VLAN 1 is for users
- VLAN 2 is for management
- VLAN 3 is for VoIP phones
- VLAN 4 is for surveillance cameras
Our VLAN scheme must be the same on all the switches in our organization. If we mess up and use VLAN 2 for VoIP phones on another switch for example, the network will malfunction, and the phones won’t be able to connect to the network. This also introduces security risks.
We must make sure that VLAN 1 on Switch 1 is VLAN 1 on Switch 2, VLAN 2 on Switch 1 is VLAN 2 on Switch 2, etc.
The switches can learn the VLANs automatically through VLAN Trunking Protocol, or VTP.
When you create a VLAN on one switch, it advertises the VLAN to other switches so that they automatically configure themselves. VTP can add or delete VLANs.
We can type vtp mode transparent to turn it on and vtp mode off to turn it off. When we use VTP, we configure the VLAN on ‘server’ switches. Client switches copy the VLAN data from server switches.
I said that each VLAN is a separate subnet. Each VLAN is like a separate physical network. How does traffic get from a device on one VLAN to a device on another VLAN? We can connect a router to our switch and route traffic between VLANs. Or we can use a Layer 3 Switch, also known as a multilayer switch.
Consider the following. I have device aaaa and cccc on VLAN 1 and bbbb and dddd on VLAN 2. They can’t talk to each other.
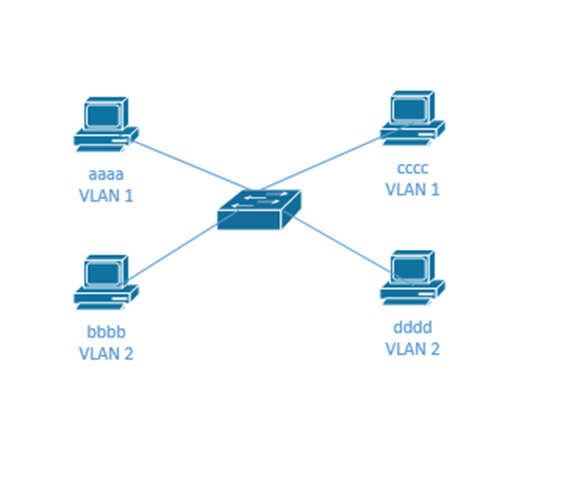
I need to add a router so that the devices can transfer data between VLANs. But I would need to connect the router to all the VLANs. I could either connect a physical cable from the router to a switch port on each VLAN, or I could connect the router to a trunk port on the switch. Sometimes this setup is called Router on a Stick or ROAS.
Or I could avoid using a router by using a Layer 3 switch.
How do we configure a VLAN on a switch?
- Enter the configuration mode
- Type vlan <VLAN number>
- name <name> – we can give the VLAN a descriptive name, but this is optional. Spaces aren’t allowed in the name.
- Type vlan <VLAN number>
- Go back to each interface
- interface <interface number>
- switchport access vlan <VLAN number> – this gives the port its default VLAN. The default is 1.
- switchport voice vlan <vlan number> – if we have a voice VLAN, we can add an additional VLAN for a VoIP phone.
- switchport mode access – this tells the switch that the port is in access mode instead of trunking mode
- interface <interface number>
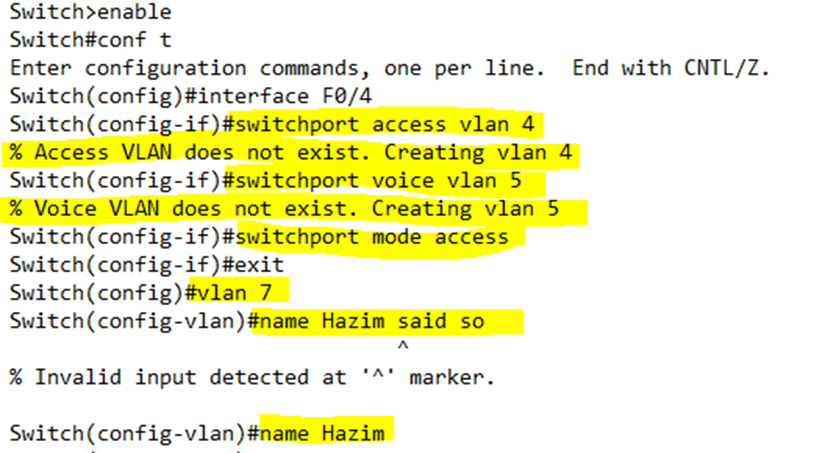
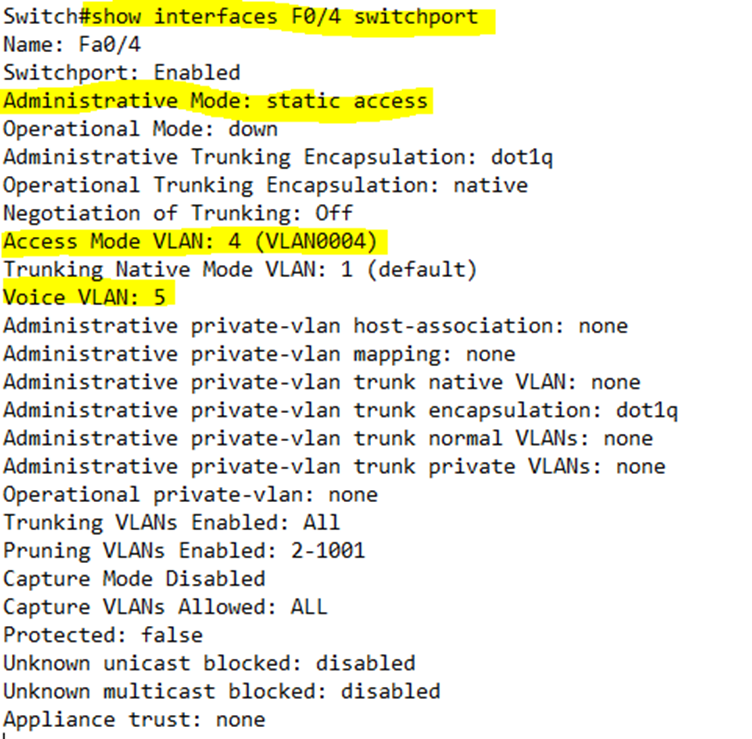
In this example, I configured interface F0/4 as an access port. I added it to VLAN 4. I also added it to voice VLAN 5. Neither VLAN 4 nor VLAN 5 existed, so the switch informed me that it created them once they were added to the port.
Then I created VLAN 7 and tried to call it “Hazim said so”, but the switch rejected this description because it had a space in it. I settled with calling it “Hazim”.
Remember, we can configure a range of interfaces with a VLAN, all at the same time.
If we add a port to a VLAN that doesn’t exist, the switch automatically creates the VLAN, and then adds the ports to it.
Packets in the voice VLAN are tagged by the phone. An access port with a voice VLAN is like a mini-trunk port, but we don’t need to think about it as a real trunk. The switch won’t list it as a trunk port.
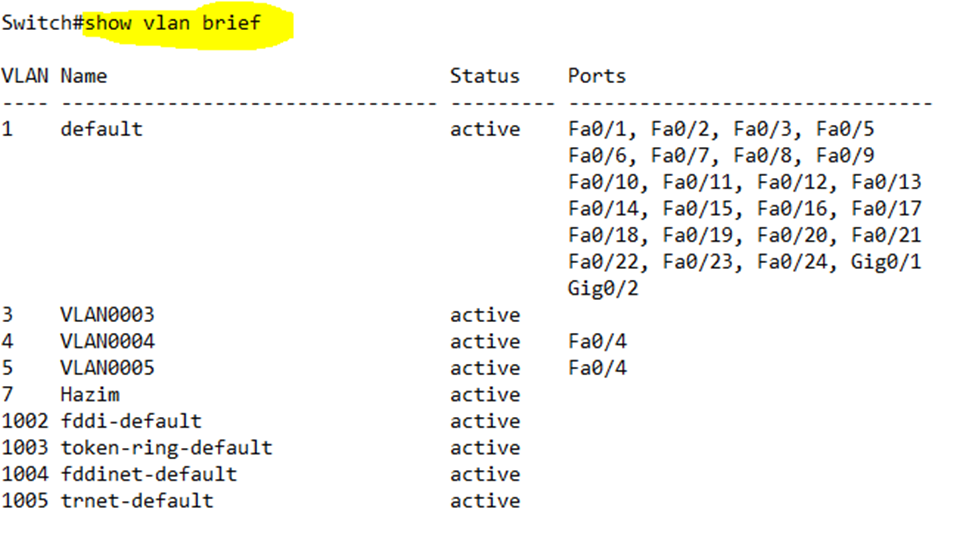
We can view the VLANs on a switch by typing show vlan brief. We can also see each port assigned to each VLAN. If we type show vlan id <VLAN number> we can view more details about a specific VLAN.
When I ran show vlan brief on my switch, it showed me that VLANs 1, 3, 4, 5, and 7 are active on my switch. All the ports are on VLAN 1, which is the default VLAN (according to its name), except for Port 4. Port 4 is on VLANs 4 and 5.
VLANs 3 and 7 exist but aren’t assigned to any ports.
How do we configure a trunk port on a switch? We go back to the interface configuration and type switchport mode trunk, then the port becomes a trunk.
Cisco switches use DTP or Dynamic Trunking Protocol to communicate. When we connect an interface on one switch to an interface on another switch, the two switches decide if they should negotiate a trunk. They decide how they are going to communicate the trunking data.
When configuring a trunk port, we can choose what protocol to use – either 802.1Q or ISL. Remember that many switches only support 802.1Q. If the two switch supports both protocols, they can decide what protocol to use. The use of the protocol might be known as encapsulation.
We can also choose the port’s administrative mode. There are three choices – always trunk (the port will always be a trunk port), never trunk (the port will never be a trunk port), or negotiate (the port will turn on trunking when connected to a trunk port on another switch; otherwise it will operate as an access port).
How do we configure the trunking settings? We enter the interface configuration.
- switchport trunk encapsulation [dot1q | isl | negotiate]. This lets us choose whether the port must use 802.1q encapsulation, ISL encapsulation, or will negotiate encapsulation with another switch.
- switchport mode [access|trunk|dynamic desirable|dynamic auto]. This lets us choose the type of port
- access – always operate as an access port
- trunk – always operate as a trunk port
- dynamic desirable – sends a negotiation message to the other switch to create a trunk and listens for negotiation messages from the other switch. If messages are received, it will create a trunk.
- dynamic auto – only listens for negotiation messages from the other switch to create a trunk. If messages are received, it will create a trunk.
Why do we bother with a dynamic auto setting? Maybe we want the switch to connect to another switch over a single VLAN and not trunk. If ports on two different switches are set to dynamic auto, and are connected, they won’t establish a trunk.
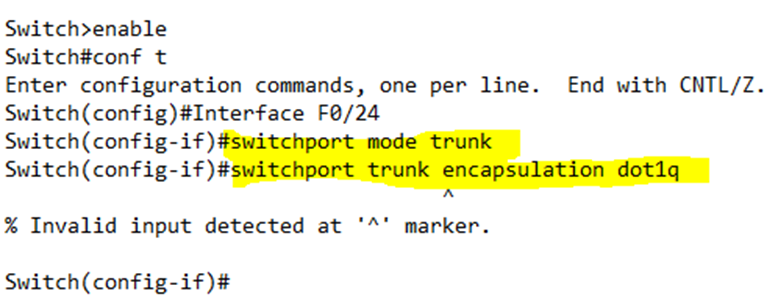
In the example below, I configured port 24 to be a trunk port and to use 802.1Q encapsulation.
Notice that the switch didn’t accept my trunk encapsulation command. Why? The proprietary ISL trunking protocol is not supported on many switches – Cisco is taking it out. If the switch doesn’t support ISL, then by default the only trunking protocol available is 802.1Q and there is no way (or need) to configure it.
When we want to turn off negotiation, we type switchport nonegotiate
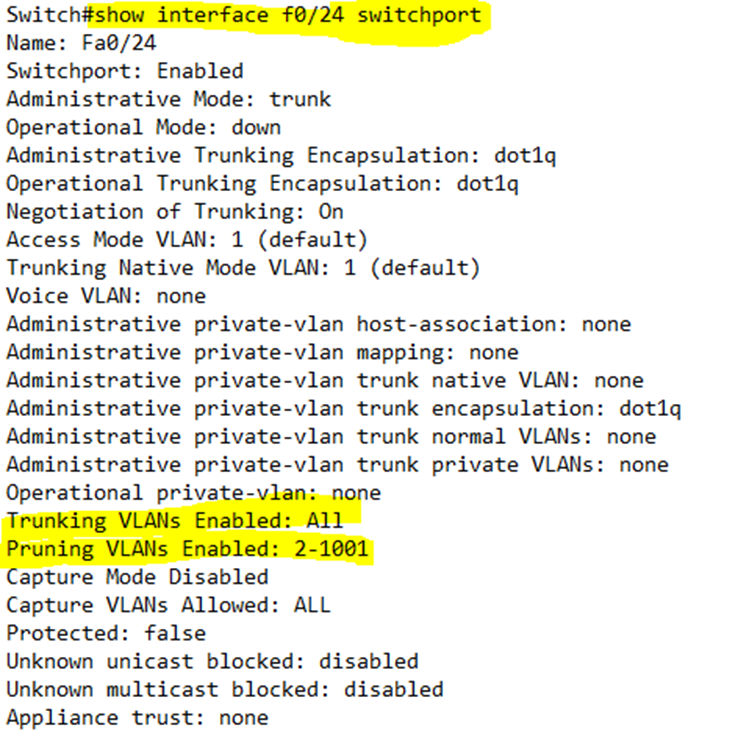
show interfaces <interface name> switchport tells us about the VLAN status of a particular switch port.
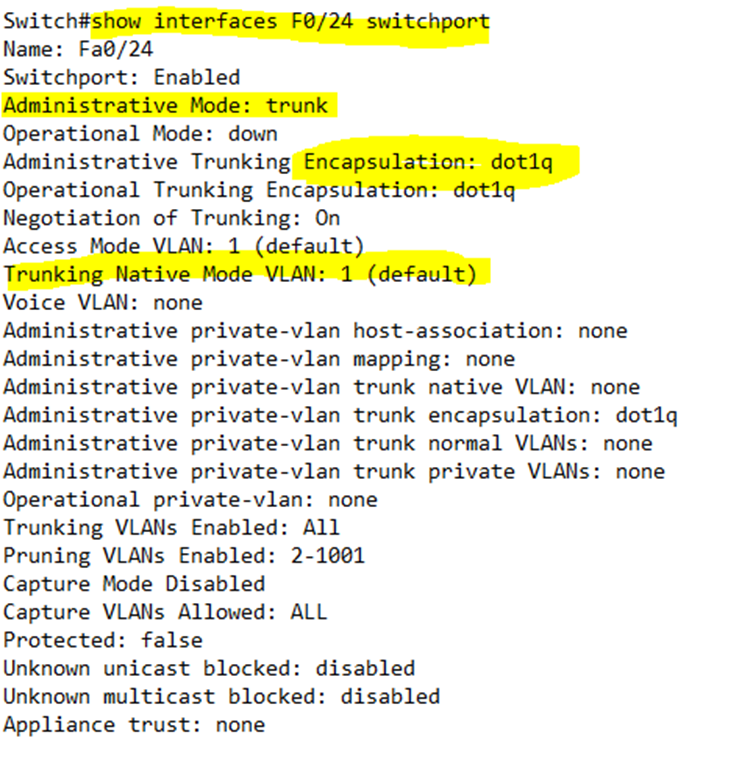
Looking at the VLAN status of port 24, I can see that it is set to trunk, its encapsulation is 802.1Q, and its native VLAN is 1.
Looking at the VLAN status of port 24, I can see that it is set to access, its encapsulation is 802.1Q, its default VLAN is 4, and its voice VLAN is 5. Notice also that it has a native VLAN of 5.
In summary, the command shows
- Administrative Mode – what the port is configured for (trunk or access).
- Operational Mode – if the port is configured to negotiate a trunk, then this tells us whether the port successfully configured a trunk, is operating in access mode, or is down.
- Administrative Trunking Encapsulation – what kind of encapsulation the port is set to.
- Operational Trunking Encapsulation – if the port is configured to negotiate an encapsulation, and is operating in trunk mode, this tells us the encapsulation protocol that the port chose to use.
Just like interfaces, we can shutdown VLANs. We just go to the VLAN interface configuration and type shutdown. We can turn the VLAN back on by typing no shutdown.
A switch will not forward a frame belonging to an unknown VLAN or to a shutdown VLAN. For example, my switch has VLANs 1, 3, 4, and 5 configured, but 5 is shut down. If my switch receives traffic on its trunk port that is tagged with VLAN 5, it will drop the traffic. If my switch receives traffic on its trunk port that is tagged with VLAN 6, it will drop the traffic.
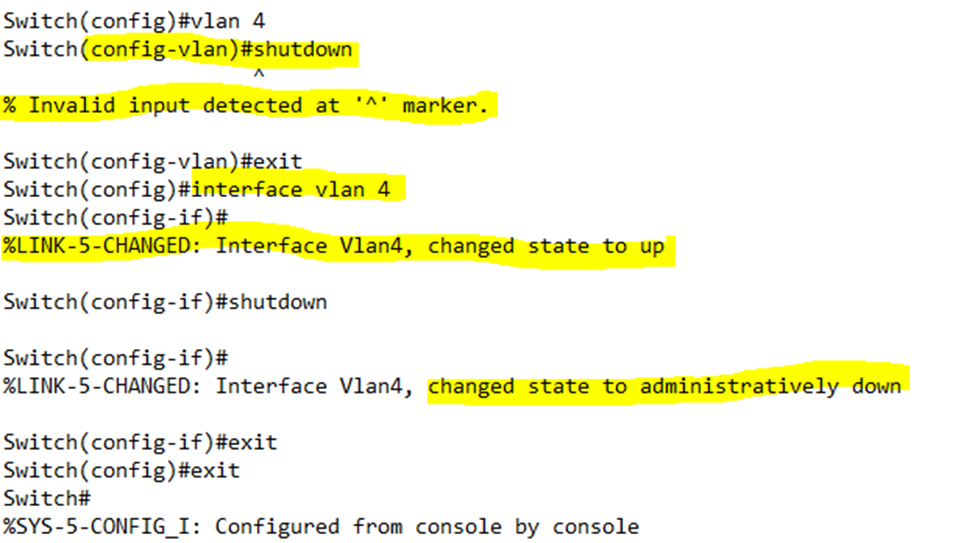
In the example below, I tried to shutdown VLAN 4, but the switch gave me an error. We can’t shutdown the VLAN from the VLAN configuration – only from the VLAN interface configuration. Notice that there are two separate configurations – one to configure the VLAN’s settings and one to configure it as an interface.
Notice also that as soon as I entered the VLAN 4 interface configuration, the switch changed VLAN 4’s status to up. By default, when we create a VLAN its status is set to down, not up. We don’t want to create a VLAN and have it transmit data right away – we might need to configure some settings first.
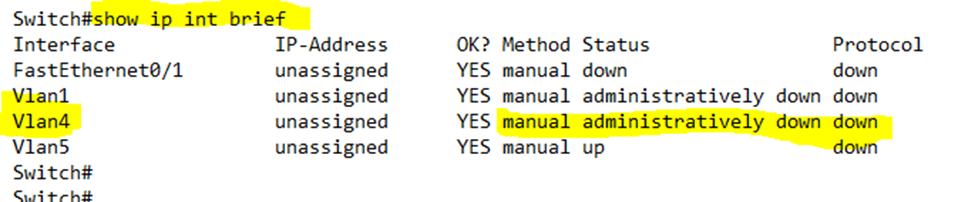
We can type show vlan to view the VLAN status.
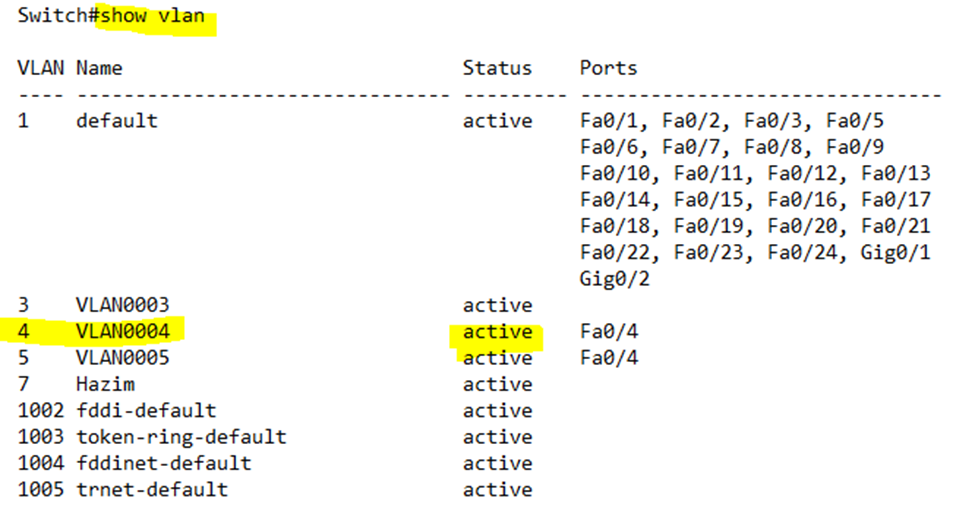
Notice that the VLAN 4 is still “active”. To see whether it is up or down, I need to type show ip interface brief.
Two switches won’t form a trunk if
- One switch has the port on access and the other switch has the port on trunk – only frames tagged with the native VLAN will be forwarded
- Both switches use dynamic auto – only frames tagged with the native VLAN will be forwarded; tagged frames will be dropped.
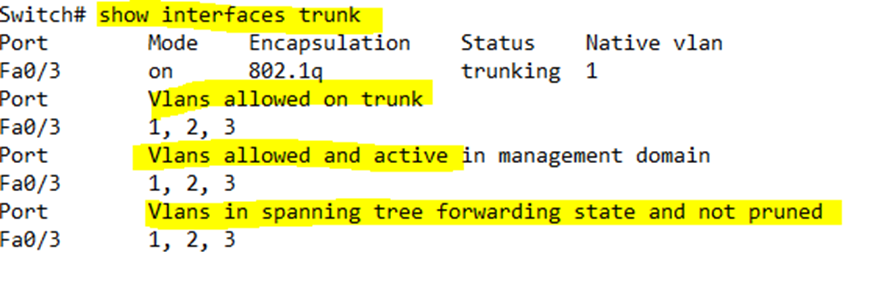
If we type show interfaces trunk, the switch will show details about all the established trunk interfaces.
- VLANs allowed on the trunk – all the VLANs are allowed by default unless we have specified a specific set of VLANs
- VLANs allowed and active – VLANs allowed, except for VLANs we learned about from other switches and VLANs we shut down
- VLANs allowed in STP and not pruned – VLANs allowed, except for VLANs we learned from other switches or shut down or in an STP blocking state
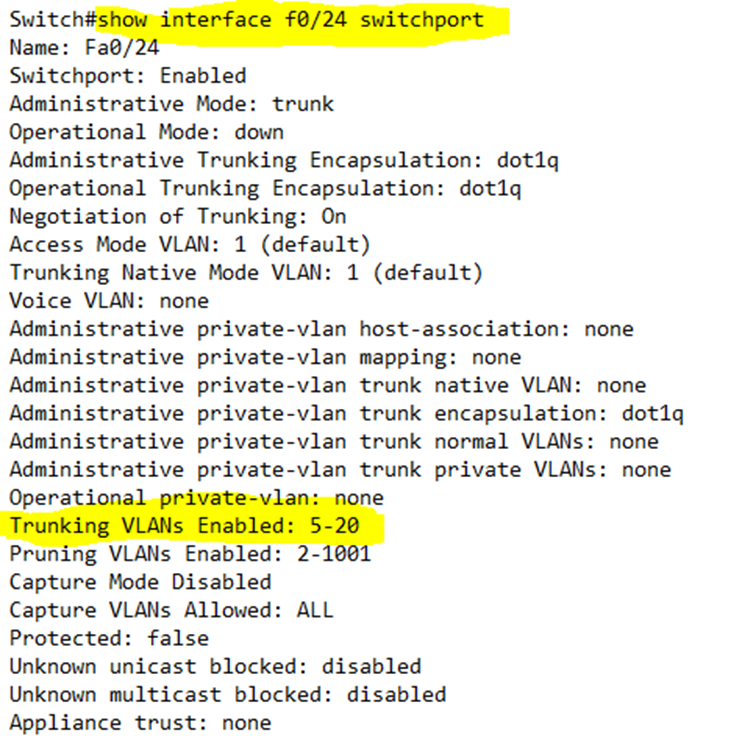
If we type show interface <interface name> switchport, it will give us details about a specific physical trunk port
By default, all VLANs are forwarded on all trunk ports. In the trunk port configuration, I can limit the VLANs by typing switchport trunk allowed vlan <beginning of range>-<end of range>.
For example, I have decided to allow only VLANs 5 through 20 on Interface F0/24 (port 24).
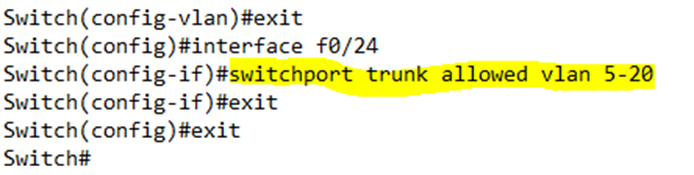
Now we can see that the trunking VLANs that are approved are from 5 to 20.
switchport trunk native vlan <VLAN number> sets the native VLAN on a physical interface.
How do we troubleshoot a VLAN?
- Make sure that the same VLANs are configured on all the switches
- Make sure that the trunk ports are physically connected
- Make sure that the encapsulation is the same on both switches
- Make sure that the trunk mode is configured on both switches
- Make sure that the VLANs are not shut down
- Make sure that the native VLAN is the same on both switches
- Make sure that the VLAN is allowed on the trunk port of both switches