
2.9 Configure the components of a wireless LAN access for client connectivity using GUI only such as WLAN creation, security settings, QoS profiles, and advanced WLAN settings
A LAP advertises the SSID or Service Set Identifier so that a client can connect to the network. In the background, the WLC connects the WLAN to a VLAN. It takes traffic from the client and passes it to the network. Once we’ve created a WLAN on the controller, the controller will automatically configure all the LAPs.
The maximum number of WLANs on a controller is 512, but the maximum number that a LAP can broadcast is 16. Each new WLAN advertised by a LAP reduces the resources available to that LAP. The LAP must advertise each SSID on a regular interval, and the more WLANs we have, the more time the AP must spend broadcasting SSIDs, and the less time it can spend sending/receiving traffic. That means a LAP can spend more time advertising its SSIDs than it does sending and receiving traffic.
We should limit the number of SSIDs to three if possible. If we need a larger number of SSIDs, we might sort LAPs into different groups and assign some WLANs to some groups and other WLANs to other groups. For each WLAN, we must tell the controller
- The name of the SSID
- The controller interface and VLAN assigned to that WLAN
- The wireless security type we will use
The first step is to configure a security server to authenticate users who are attempting to connect to our wireless network. Each time a user attempts to connect to the wireless network, he is prompted to enter his credentials
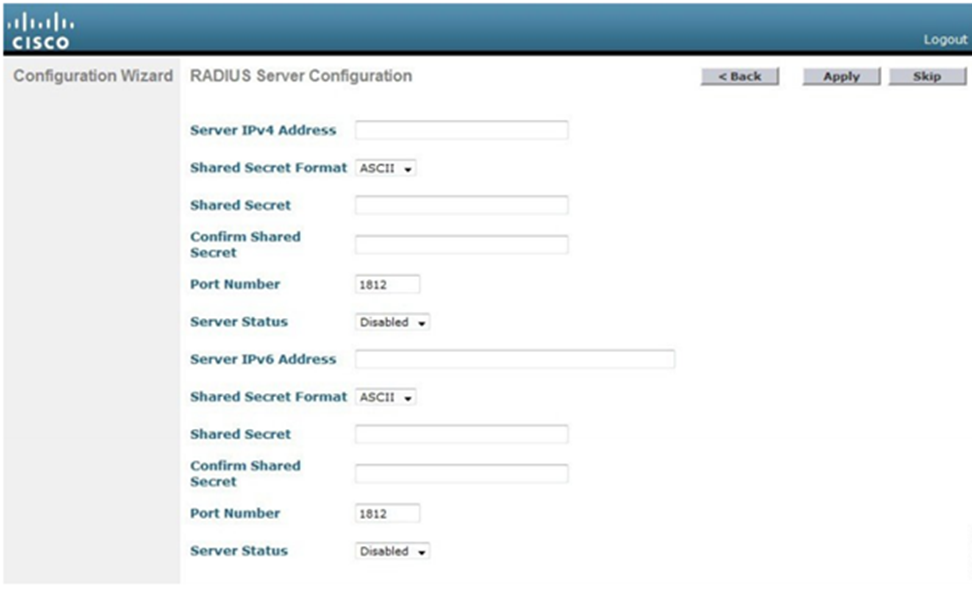
If we are authenticating users with a passcode, we don’t need to do this. Otherwise, we choose Security -> AAA -> RADIUS > Authentication. We can set this up through the configuration wizard as well.
We must specify the server’s IP address, shared secret, and port number. If we have multiple RADIUS servers, the controller will try each of them in order when attempting to authenticate a user. We can enable or disable a server from this page. When a server is disabled, the WLC won’t attempt to authenticate a user through it.
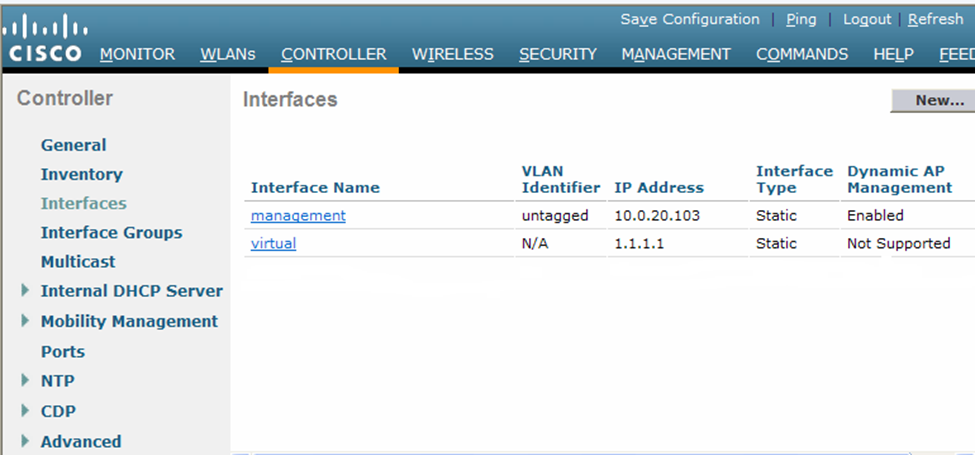
Second, we create a dynamic interface. Choose Controller -> Interfaces. The controller will show you all the existing interfaces. There will already be a management interface and a virtual interface. To create a dynamic interface, we must choose its name and assign a VLAN to it. We also assign it an IP address, subnet mask, gateway, and DHCP server address. When the interface receives a DHCP request from a client, it will forward the request to the DHCP server.
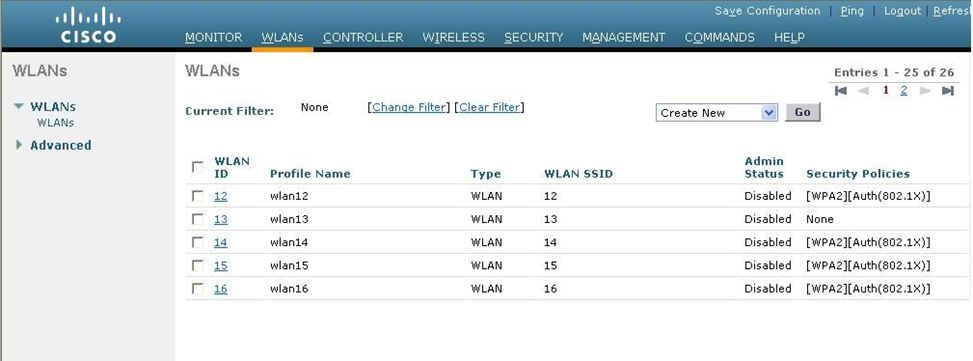
Third, we create a new WLAN. Choose WLANs and the controller will show you all the existing WLANs. To create a new WLAN, we must specify the SSID name and a descriptive name. We also choose a WLAN ID number. There are more advanced options for each WLAN, which you can specify after it has been created
- Whether the WLAN is enabled or disabled
- The type of security enabled on the WLAN
- Whether the WLAN will be broadcasted on all LAPs or only on LAPs that support 2.4Ghz or only on LAPs that support 5Ghz. This is called the Radio Policy, and it can be specified by selecting a policy such as 802.11a, 802.11a/g, 802.11g, or 802.11b/g. By default, a WLAN will be broadcast on all LAPs.
- The dynamic interface that is connected to the WLAN. We must create a dynamic interface before we can properly configure a WLAN.
- Whether the LAPs should broadcast the SSID name or whether it should be hidden. Some administrators believe having a hidden network is a good idea, but in practice it is ineffective.
- The WLAN security type. There are several options, including some that are no longer considered secure. We should select a secure option.
- None. This is also known as Open Authentication.
- WPA+WPA2. This uses Wi-Fi protected access. In other words, a user must enter a static security key.
- 802.1x. This uses EAP authentication with dynamic WEP.
- Static WEP. This uses a static WEP key that a user must enter. WEP is considered insecure.
- Static WEP + 802.1x. This uses EAP authentication or a static WEP key.
- CKIP. This uses the Cisco Key Integrity Protocol.
- None + EAP Passthrough. This uses open authentication with remote EAP authentication. The client device can connect via open authentication, and then the user is authenticated via EAP.
Once we select a general security type, we can choose a more specific security type. Remember that we created a security server connection earlier (a RADIUS server).
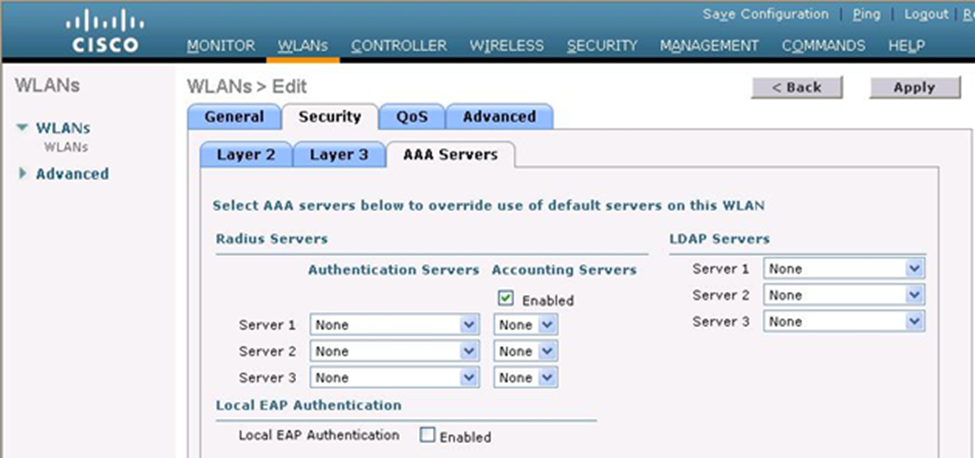
If we select an option with 802.1x, then the controller will pass the user’s login credentials to an external authentication server. That means that the controller doesn’t decide if a user is allowed to connect – it asks another server if that user is permitted to connect. In the AAA Servers tab, we can choose up to six of the servers we specified earlier. The WLC will try each server in order when attempting to authenticate a user.
The WLC will contact each server through the management interface. We can check the Radius Server Overwrite Interface box so that the WLC can contact the server through its dynamic interface instead.
We next need to configure the Quality of Service by selecting QoS. The controller will not prioritize traffic on any WLAN by default. Each wireless frame is given the same priority. We can ask the WLC to give traffic from specific WLANs a higher priority. The following priorities are available
- Platinum for voice traffic
- Gold for video conferencing traffic
- Silver for regular traffic
- Bronze for background traffic
There are more advanced features that we can configure include detecting holes in the Wi-Fi coverage, blocking specific clients from connecting, or limiting the amount of traffic that each client can pass.
By default, a WLAN session expires after thirty minutes. The client must reauthenticate with the WLC after the time expires. That means that your Wi-Fi will disconnect every thirty minutes. We can adjust this time limit.
The WLC maintains a set of security policies, which you can view under Security -> Wireless Protection Policies -> Client Exclusion Policies. If a client violates one of these policies, it is blocked from connecting for 60 seconds. Possible violations include using the wrong IP address or entering the wrong password.
By default, you cannot manage a WLC from a Wi-Fi connection. The WLC blocks management traffic that originates on a Wi-Fi connection to prevent rogue users from attempting to modify settings on the controller. You must connect to the WLC through a wired connection, unless you change this.