5.6 Configure and verify access control lists
An ACL or Access Control List is most commonly used by routers to filter traffic and to prioritize different types of packets.
We can apply the rules of an access control list on an incoming interface (where the packet enters the router) or on an outgoing interface (where the packet leaves the router). That means we can decide to apply an access control list before we make a routing decision or after.
We must enable the access control list on each router interface that processes a packet, and in the same direction that the packet travels.
On a Cisco router, there are only two options for what we can do with a packet: permit or deny. Permit allows a packet to continue to its destination while deny discards the packet.
The ACL looks at the source IP address, destination IP address, source port, and/or destination port to determine whether to permit or deny the packet. Essentially, an ACL is a list of rules. When the router receives a packet, if an ACL applies to an interface where the packet was received or is about to be sent out of, the router checks each rule in the ACL, one-by-one, against the packet. The router applies the first rule in the ACL that matches the packet, and then stops processing.
For example, if my ACL says
- Rule #1: Permit all traffic from 192.168.0.1
- Rule #2: Deny all traffic from the range 192.168.0.1 to 192.168.0.255
- Rule #3: Permit all traffic from the range 192.168.0.0 to 192.168.255.255
A packet from 192.168.0.1 will match Rule #1 and will be permitted. Technically, it will also match Rule #2 and Rule #3, but the router will stop processing after Rule #1.
A packet from 192.168.0.2 will not match Rule #1, but will match Rule #2, and will be denied. Technically, it will match Rule #3, but the router will stop processing after Rule #2.
A packet from 192.168.2.1 will not match Rule #1 and will not match Rule #2 but will match Rule #3 and will be permitted.
A packet from 192.170.0.0 will not match any rules and will therefore be denied. By default, you can assume that at the end of each ACL is a hidden rule that denies traffic to any packet that didn’t match the previous rules.
Each ACL must be given a name or a number. There are two types of ACLs
- Standard Numbered ACLs (1 to 99 and 1300 to 1999)
- Extended Numbered ACLs (100 to 199 and 2000 to 2699)
An ACL can be named or numbered.
- A Standard Named ACL matches the packet based on its source IP address only. It applies only in subcommands and is identified by its name.
- A Standard Numbered ACL matches the packet based on its source IP address only. It applies in the router’s global configuration and is identified by its number.
- An Extended Named ACL matches the packet based on its source IP address, destination IP address, source port, and/or destination port. It applies only in subcommands and is identified by its name.
- An Extended Numbered ACL matches the packet based on its source IP address, destination IP address, source port, and/or destination port. It applies in the router’s global configuration and is identified by its number.
How do we configure an ACL?
We type access-list <#> <action> <parameters>
- The # is the number of the access control list that we want to configure from 1 to 99 or from 1300 to 1999
- The action is either to permit or deny the traffic
- The parameters tell the router us what properties of the traffic to match. In a standard ACL, the parameter is the source IP address.
If we want to stop any traffic from the address 4.4.4.4, we would type access-list 1 deny 4.4.4.4.
In older versions of IOS, we would add the word host before the IP address, access-list 1 deny host 4.4.4.4.
If we want to match a range of IP addresses, we can use a wildcard mask. The wildcard mask looks like a subnet mask, in that it contains four octets. If an octet is all “0”, then the router will compare it with the source IP address. If the octet is “255”, then the router will ignore it.
In IPv4, that means that I have five possible decimal wildcard masks.
- 0.0.0.0 – this means that we should match the exact IP address. We don’t need to use a wildcard if we want to match the exact IP address.
- 0.0.0.255 – this means that we should match IP addresses with the same first three octets.
- 0.0.255.255 – this means that we should match IP addresses with the same first two octets.
- 0.255.255.255 – this means that we should match IP addresses with the same first octet.
- 255.255.255.255 – this means that we should match all IP addresses. It is like not using an access control list.
For example, if I want my ACL to apply to addresses in the range of 192.168.0.0 to 192.168.0.255, I am trying to match the first three octets (192.168.0). I would use a wildcard of 0.0.0.255, so I could write access-list 1 deny 192.168.0.0 0.0.0.255.
Notice that I wrote 192.168.0.0 as the IP address that I wanted to match. I could have written any valid IP address in that range, such as 192.168.0.10, but the preferred method is to set the matching octets to 0. If we don’t, IOS will automatically change them to 0 when saving the command.
The wildcard masks I mentioned were called decimal wildcard masks. If I want to get more granular, I can use a binary wildcard mask. We can use a binary mask to match a specific subnet that is not /8, /16, /24, or /32. How do we do this?
- We figure out the subnet that we want the ACL to apply to
- We figure out the subnet mask of the subnet
- We calculate a wildcard mask by subtracting the subnet mask from 255.255.255.255
For example, if my subnet is 10.10.2.0 and my subnet mask is 255.255.255.128, then I would subtract 255.255.255.128 from 255.255.255.255. The result is 0.0.0.127.
I would configure my ACL as access-list 1 deny 10.10.2.0 0.0.0.127.
If I was given access-list 1 deny 10.10.2.0 0.0.0.127 as a command to reverse engineer to determine the range of addresses implied by the wildcard mask, I would just add the wildcard mask to the IP address.
10.10.2.0 + 0.0.0.127 = 10.10.2.127
Therefore, my network range is from 10.10.2.0 to 10.10.2.127. Addresses with sources inside this network are denied by my list.
As I said, by default the router denies any packet that doesn’t match any rules in the list. We can override this by creating a list with the word “any” and type access-list 1 permit any. This would be useful if we want to allow all traffic except for those from a few sources. We would create several specific deny rules followed by one “any” rule.
We could also create an access-list 1 deny any rule to block traffic. This rule would be redundant, but it would allow us to keep track of the number of packets that had been denied. An ACL will log the number of packets that it denies, but the hidden deny rule doesn’t keep track of anything.
In my examples, I used the number “1” for my list. That means that all my rules belong to List #1. I don’t have to create a List, I just create multiple rules using the access-list command and give each of them the same number.
The best practices for configuring an ACL
- The ACL should be created as close to the packet’s destination as possible. That means it is better to create it on an outgoing interface instead of an incoming interface. This avoids the risk of accidentally dropping packets.
- The extended ACL should be created as close to the packet’s source as possible. Extended ACLs must match many parameters and there is less risk that a packet will be dropped accidentally. By placing the extended ACL close to the source, we avoid having to process packets that will be dropped.
- We should be able to determine each packet’s source IP address.
- Remember that the router will apply all the rules sequentially until it finds one that matches. Then it will stop applying rules. We should configure the rules so that they are sequential in an order that makes sense.
- We should place the most specific rules at the top of the ACL.
- The router will deny any traffic that doesn’t match any rules.
- For security reasons and to avoid disruption to the network, we should disable an ACL before making changes to it.
We can apply an ACL to each interface by entering the interface configuration
Type ip access-group <ACL number> <direction>. The ACL number is the list number. The direction is either “in” or “out” and determines whether the rule will apply to traffic entering or leaving the interface. The interface will now apply all the rules that belong to the ACL number.
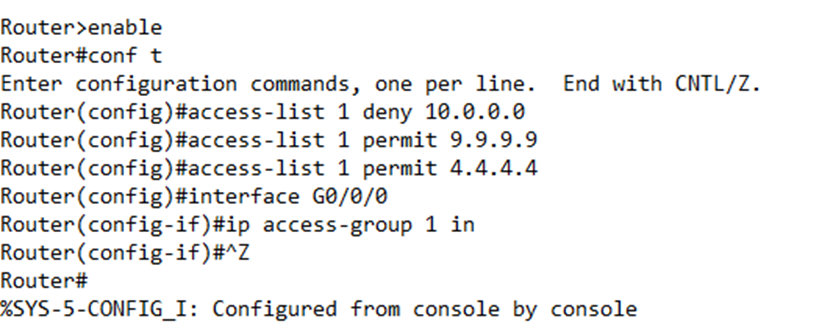
In my router configuration, I might choose to permit traffic from 9.9.9.9, and 4.4.4.4, and deny traffic from 10.0.0.0 coming in through interface G0/0/0.
Below, I configured my router
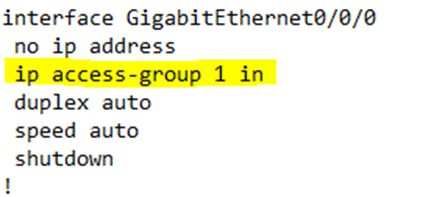
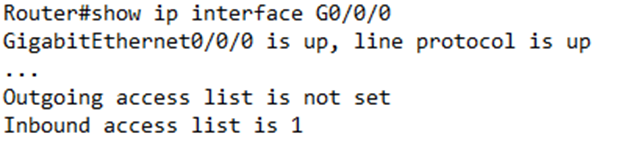
When we check the router configuration, we see that the GigabitEthernet0/0/0 interface has the command “ip access-group 1 in”
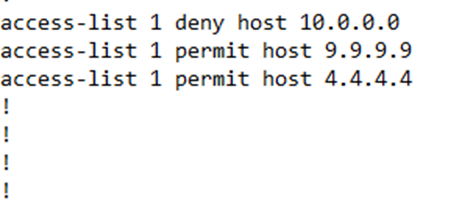
Further down in the configuration, we see the access-list
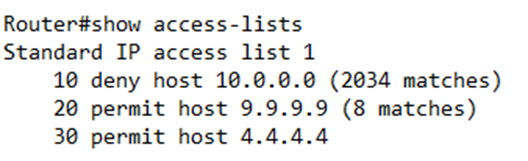
If we want to see a list of our IPv4 ACLs, we can type show ip access-lists. If we want to see all our ACLs, including IPv6 ACLs, we type show access-lists.
The router lists each access list along with its rules and number of matches for each rule. If there are no matches, then the router does not list anything next to the rule.
If we look at the relevant router interface, it will tell us the number of the outbound and inbound ACL. If there is no ACL, it will say “not set”.
Some ACL troubleshooting tips
- Are the ACL rules being applied in the correct order?
- Do the IP addresses and wildcard masks match the traffic?
- Is the ACL applied to the correct interface?
- Is the ACL applied in the correct direction?
- If I run a tracert or ping on my router, it will not be filtered by the router ACL, so don’t worry. We can run the tracert or ping as required.
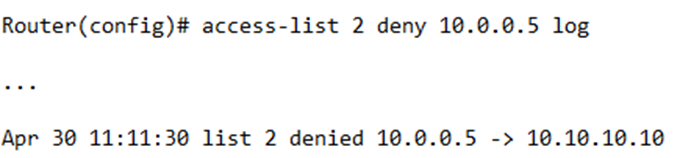
- We can perform some advanced troubleshooting by enabling logging on a specific rule. We would type access-list <number> permit <IP address> <wildcard mask> log. Notice that we added “log” at the end.
Now the router will list each packet, its source IP address, its destination IP address, and what happened to it.
For example, I created a rule to deny traffic from the address 10.0.0.5. I received a packet headed towards 10.10.10.10 and my router decided to deny it on April 30 at 11:11 AM. The router outputs this data.
When configuring an extended ACL, we would type access-list <list number> <action> <protocol> <source IP address and wildcard> <source port> <destination IP address and wildcard> <destination port>
- The list number is the same as before, but the range can be from 100 to 199 or 2000 to 2699. When we specify a number in this range, the router understands that we are configuring an Extended ACL and expects to see additional parameters.
- The action is either permit or deny
- The protocol can be IP, TCP, UDP, or ICMP
- The source IP address and wildcard are configured as before.
- We now have a destination IP address and wildcard as well. The same wildcard rules apply.
- We also have a source port and a destination port. We have several options here
- eq <#>. This matches traffic equal to #. For example, eq 21 matches traffic on port 21.
If we don’t want to write the port number, we could also write a keyword. For example, ‘eq www’ matches traffic on the WWW port, which is port 80.
The router converts the most popular port numbers to their keywords. For example, if you typed “eq 21’, the router would change it to “eq ftp’
- ne <#>. This matches traffic that is not equal to #. For example, ne 21 matches traffic that is not on port 21.
- lt <#>. This matches traffic that is less than #. For example, lt 1000 matches traffic that is on ports between 1 and 1999.
- gt <#>. This matches traffic that is greater than #. For example, gt 1000 matches traffic that is on ports greater than 1000.
- range <#> to <#>. This matches traffic in a range. For example, range 2000 to 3000 matches traffic on ports between 2000 and 3000.
- eq <#>. This matches traffic equal to #. For example, eq 21 matches traffic on port 21.
For an extended ACL, if we configure a source IP address or destination IP address without a wildcard (that is, we are matching a single IP address), we must add the word “host” before the IP address.
All the parameters specified by the rule must match a packet for the rule to be applied.
For example, access-list 101 deny tcp host 5.5.5.5 gt 1000 will deny any traffic that is TCP based, with a source IP address of 5.5.5.5 and a source port that is greater than 1000. Notice that if we only have one IP address, the router assumes that it is a source IP address and not a destination. If we don’t want to specify a source IP address, we must use the any keyword.
For example, access-list 101 deny udp any gt 50000 10.10.10.0 255.255.255.0 lt 1000 will deny any UDP traffic from any source IP address, with a source port that is greater than 50000 and has a destination on the network 10.10.10.0 to 10.10.10.255 and a destination port less than 1000.
We create the extended access list the same way as we did with the standard access list. We add the extended access list to the router interfaces the same way. The router applies the list the same way – it stops processing the list when it sees a match.
Here is a tip. If we create a complicated access control list, we might want to leave a comment so that later we can figure out what it does.
Using the remark command, we can write access-list <access list number> remark <text>, where <text> is the comment that we want to leave.
A Named ACL works exactly like a Numbered ACL, except that it has a name. The name makes it easier to remember what it does. Also, we configure a Named ACL kind of like we configure an interface – through subcommands.
To configure a Named ACL, I would type ip access-list <type> <name>, where type is either standard or extended, and the name is the name of the list. This would take me into the Named ACL configuration. I would then enter each rule one line at a time.
For example, if I want to create a standard list called “serverlist” and allow traffic from 1.2.3.4 but deny traffic from 5.6.7.8, I would type
ip access-list standard serverlist
permit 1.2.3.4
deny 5.6.7.8
If I had a numbered ACL, I would type
access-list 1 permit 1.2.3.4
access-list 1 permit 5.6.7.8
While configuring a named ACL, I can use the remark command inside the ACL configuration.
Across the standard and extended named and numbered ACLs, I can delete a command by typing “no” in front of the command.
For example, if I wanted to delete access-list 1 permit 1.2.3.4, I would type no access-list 1 permit 1.2.3.4 in global configuration mode.
If I wanted to delete permit 1.2.3.4 from the standard list I created, I would first enter the configuration mode for that list, then I would type no permit 1.2.3.4.
Going back to my earlier example

Notice that the router added numbers (10, 20, and 30) to the start of my ACL rules. Why? It makes it easier to edit later. Remember that each rule is applied in order. If I create several rules, the router will save them, and then apply them in the order that they were created.
We can (and in some cases must) configure a numbered rule just like a named rule. To enter the numbered rule configuration, we type ip access-list <type> <number>.
If I want to add a new rule but insert it in between the existing rules, I can do so from here. I just give it a number that is in between the existing rules I want to insert it between.
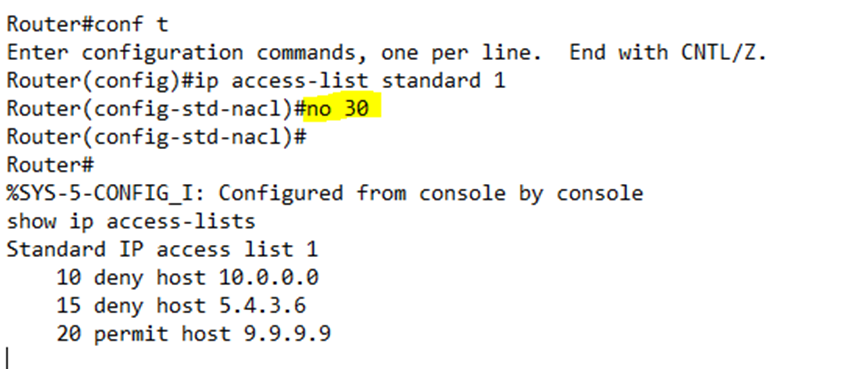
For example, if I want to create a new rule between rules 10 and 20, I could type 15 deny host 5.4.3.6. But first, I would type ip access-list standard 1 to enter the configuration for List 1.
Notice that my router prompt changed to “config-std-nacl,” which stands for standard numbered access control list.

The configuration on my router now is
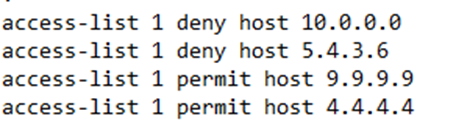
Even though we have configured the numbered rule like a named rule, the router will store the configuration like a numbered rule, as a list of global access-list commands.
If I type show ip access-lists, I can see the rules with their numbering
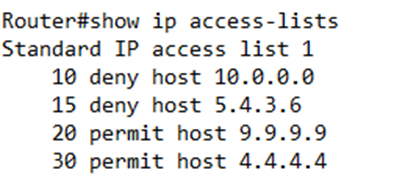
If I want to delete a rule, I can type no <rule number>. For example, if I want to delete rule 30, I would type no 30.