
5.7 Configure Layer 2 security features (DHCP snooping, dynamic ARP inspection, and port security)
We’ve talked about DHCP. What if a hacker installs a rogue DHCP server on your network? He could intercept DHCP messages from clients on your network and give them the wrong IP address, DNS, or gateway information. He could set up a fake gateway or DNS. If a client is configured with the address of this fake DNS or gateway, the hacker could intercept its traffic.
To protect against that, Cisco switches have a feature called DHCP snooping. Imagine if we have a remote DHCP server and a hacker installed a rogue DHCP on our local network.
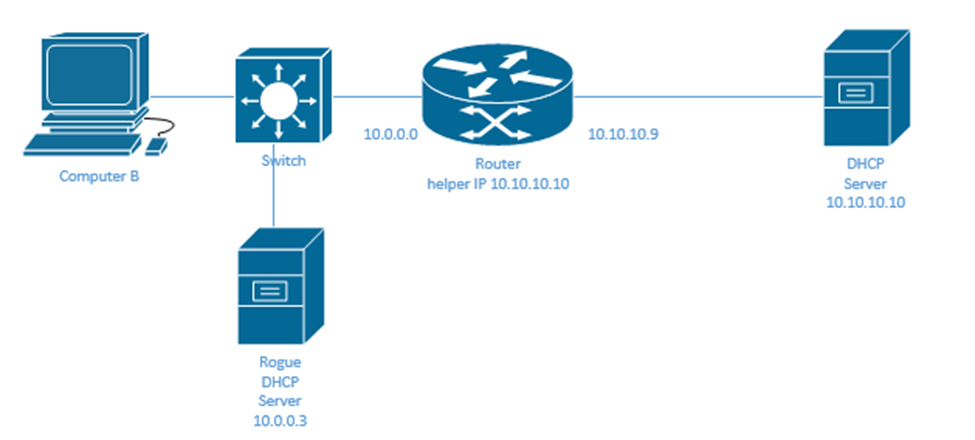
Remember that a DHCP Discover message is a broadcast message. That means that all hosts on our local network will see it. The rogue DHCP server would see our DHCP Discover messages before the remote server because it takes longer for a message to travel through the router.
The DHCP server can give our computer a default gateway that is incorrect and intercept the traffic. For example, it could give our computer a default gateway of 10.0.0.3, which is the IP address for the rogue DHCP server.
Our router will pass the message to the remote DHCP server, which will also respond with a DHCP Offer message. But by then, our computer already received a valid DHCP Offer from the rogue DHCP server. It will most likely not accept a second DHCP Offer.
The way that we fix this is by enabling DHCP snooping on our switch. When snooping is enabled, by default, all switch ports are untrusted. That means that the switch will assume that any DHCP Offer messages entering an untrusted port have originated from a rogue DHCP server, and it will not forward them.
On an untrusted port, the switch will accept DHCP messages from clients. These messages include the DHCP Discover message.
The switch creates a table called the DHCP Snooping Binding Table. Each time a client accepts a DHCP Offer, the switch creates an entry in that table. It records the MAC address of the client and the IP address that was assigned to it. It also records the VLAN and interface that the client is connected to.
Say your computer’s IP address is 10.5.5.5, and I’m a hacker. I want to kick you off the network, so I send the DHCP server a release message saying, “release IP address 10.5.5.5”. The DHCP server will release the IP address and try to assign it to somebody else, which will disrupt your network connection.
DHCP snooping can protect against this kind of attack as well. When the switch sees a new DHCP Release message, it checks that message’s sender’s MAC address against the table. It will see that the request to release 10.5.5.5 came from my MAC address instead of yours. It knows that the message isn’t valid and doesn’t let it through.
A hacker might try to lease many hundreds or thousands of DHCP addresses so that nobody else can get any. The switch can protect against this as well. If a client sends a Discover or Request DHCP message, the switch checks its MAC address (the MAC address inside the Ethernet header) against the MAC address inside the actual message. Remember that a DHCP message is something like “hey, my MAC address is aa:bb:cc:dd:ee:ff, can I please have an IP address”. This message is encapsulated inside an IP packet which is encapsulated inside an Ethernet frame. If the MAC address sending the message is different from the MAC address inside the message, then the switch knows something is wrong, and doesn’t let it through. A hacker might send many DHCP requests from the same MAC address.
When we know which switch ports are connected to legitimate DHCP servers, we tell the switch to trust them.
To configure DHCP snooping
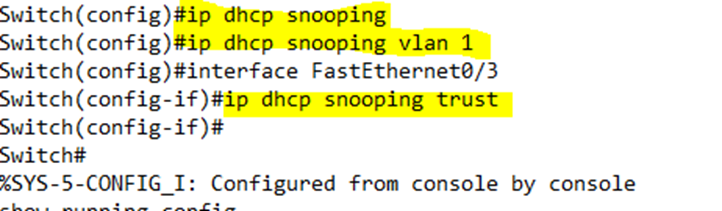
- First, we enter the global configuration and enable DHCP snooping by typing ip dhcp snooping.
- Second, we enable DHCP snooping on each individual VLAN that requires it by typing ip dhcp snooping vlan <VLAN ID>.
- Third, we enter the configuration for any interface that is connected to a trusted DHCP server and enable the trust by typing ip dhcp snooping trust. By default, all other interfaces are untrusted.
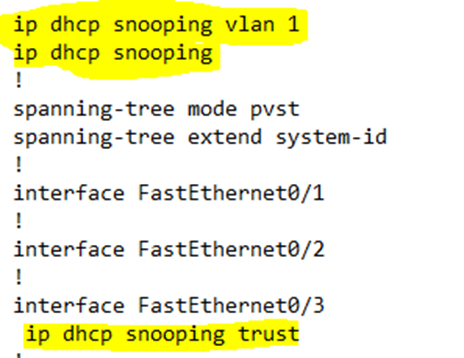
On my switch, I enabled DHCP Snooping on VLAN 1 and made port three a trusted port.
If we look at the new configuration, we can see that DHCP snooping is enabled.
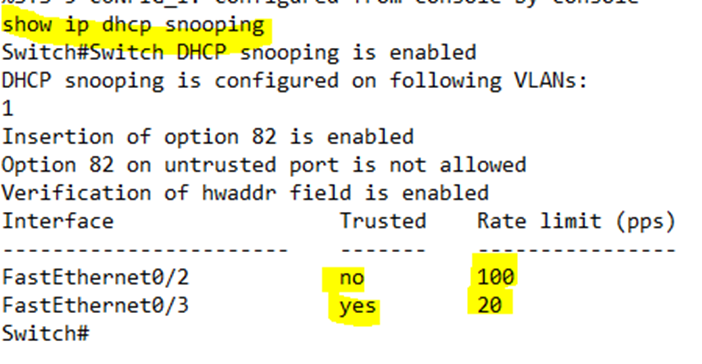
I can verify the snooping by typing show ip dhcp snooping
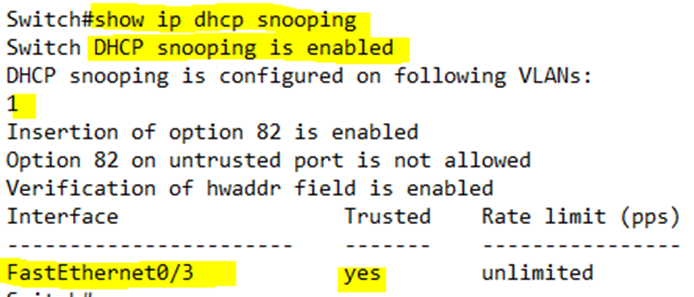
The switch shows that snooping is enabled on VLAN 1 and that FastEthernet0/3 is trusted.
There is a message that says, “Insertion of option 82 is enabled”. When a router is configured with a helper IP address to relay DHCP messages to an external DHCP server, it adds additional information into the DHCP request header. This information is known as “option 82”. If our switch is a Layer 3 switch and acts as a DHCP relay agent, it will also add “option 82” information.
If our switch isn’t acting like a DHCP relay agent, it will change the DHCP messages in a way that will prevent the DHCP server from accepting them. Thus, if our switch isn’t a DHCP relay agent (for example if it is not a Layer 3 switch, or if a DHCP server isn’t directly connected to it), we should turn this option off. We can do so by typing no ip dhcp snooping information option.
Notice also that there is a rate limit. Our interface’s rate limit is unlimited. A hacker can attack DHCP Snooping by sending many DHCP messages to overload our switch. If we receive too many DHCP messages on the port and we have set a rate limit, the switch will change that port’s status to err-disabled.
We can set the rate limit by typing ip dhcp snooping limit rate <number> on each interface. We can set the rate limit on both trusted and untrusted interfaces.
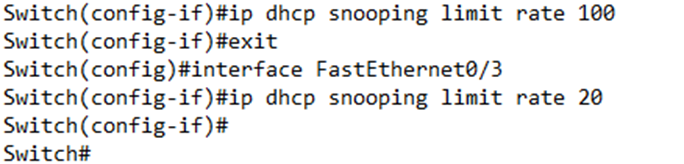
Now if we look at our snooping status we see FastEthernet0/2 is not trusted and has a rate limit of 100. FastEthernet0/3 has a rate limit of 20. An interface won’t appear in our list unless it is either trusted or has a rate limit or both.
The second feature is called Dynamic ARP Inspection or DAI. Remember that a hacker can send us fake ARP information. If my computer wants to learn the MAC address of another computer (and knows its IP address) on the same network, it sends out an ARP Request. The request says “Hey, if this is your IP address, reply with your MAC address”. The other device replies with a message called an ARP Reply.
Each ARP Request and ARP Reply message will list the sender’s IP address and MAC address. That means that a device can learn the sender’s MAC address from the ARP Request.
If a new device joins the network, it might send a broadcast ARP message to let everybody know about its MAC address. This message is called a gratuitous ARP message. It is sent in the format of an ARP Reply to the Ethernet broadcast address.
In my network, Computer B is legitimate. It has an IP address of 10.0.0.4 and a MAC address of AAAA. Computer H belongs to a hacker. It has an IP address of 10.0.0.5 and a MAC address of BBBB. Everybody knows that my computer’s IP address is 10.0.0.4 and has a MAC address of AAAA.
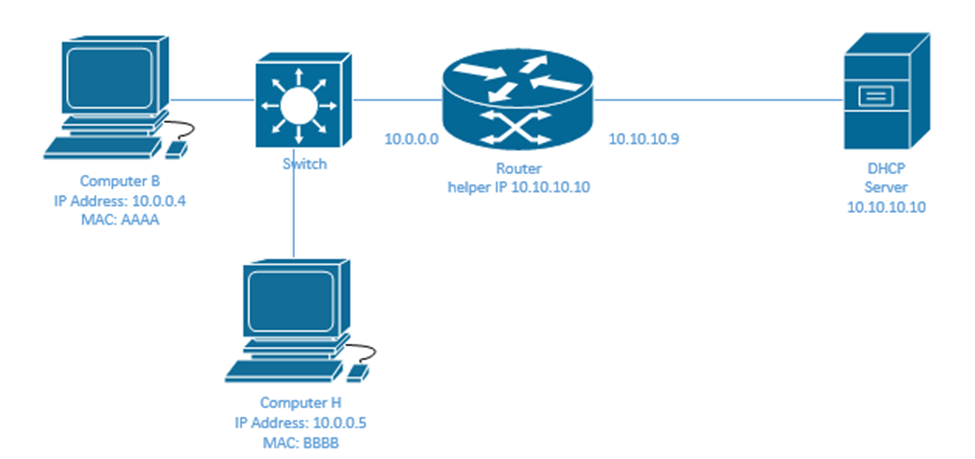
The hacker might send out a fake gratuitous ARP message and tell people that Computer B’s MAC address is BBBB. The other devices on the network will update their ARP table to say that IP address 10.0.0.4 belongs to MAC address BBBB.
When a device decides to send Computer B some traffic, it addresses it to IP address 10.0.0.4, but encapsulates that in an Ethernet frame with the MAC address BBBB. The result is that the switch forwards the frame to Computer H, because Computer H has the MAC address BBBB.
If the hacker was really sneaky, Computer H would receive the frames and change their destination to MAC address AAAA, and then send them back over the network to Computer B. Computer B wouldn’t notice that its messages were being intercepted.
When we turn on DAI, the switch checks each ARP message’s sender’s IP address and MAC address against the DHCP Snooping table. If the ARP message matches what’s in the table, the message is allowed through. Otherwise, it is blocked.
The drawback of DAI is that a device might have a static IP address and still need to send ARP messages. In that case, it won’t appear in the DHCP Snooping table. Thus, we may also need to manually configure some IP Address-MAC Address pairs in our switch. These are called ARP ACLs.
Just like ARP Snooping, we can make some ports trusted and some untrusted. We can also limit the number of ARP messages that a port receives before it is shut down.
To enable ARP Snooping, we type ip arp inspection vlan <VLAN ID> in the global configuration for each VLAN that we want to enable ARP snooping on.
Then we add ip arp inspection trust to any interface that should be trusted. By default, all ports are untrusted and subject to ARP Inspection.
In this case, I have configured inspection on VLAN 1, and trusted Port 2. ARP messages sent on Port 2 are not inspected.

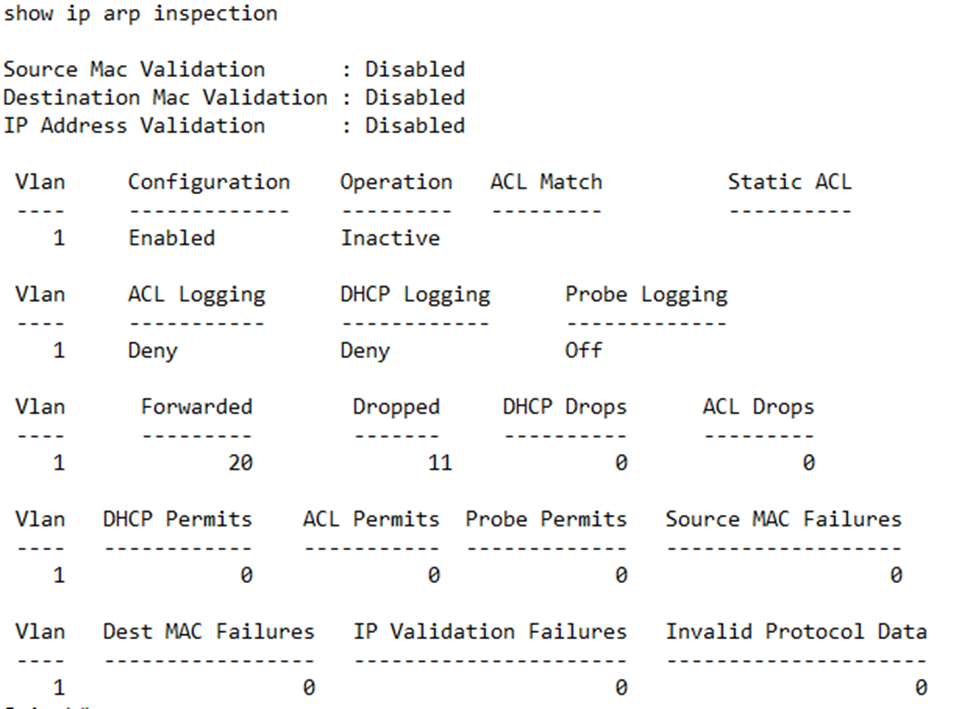
We can verify the ARP by typing show ip arp inspection.
The switch provides me with many statistics for each VLAN, including the number of ARP messages that were forwarded and the number that were dropped.
We can also type show ip dhcp snooping binding to view the IP Address-MAC Address bindings that the switch has learned.
I can add a rate limit by typing ip arp inspection limit rate <Rate>. By default, the rate is the number of messages per second.
I can also type ip arp inspection limit rate <Rate> burst interval <interval>. For example, if I wanted to allow 100 messages every 60 seconds, I would type ip arp inspection limit rate 100 burst interval 60.

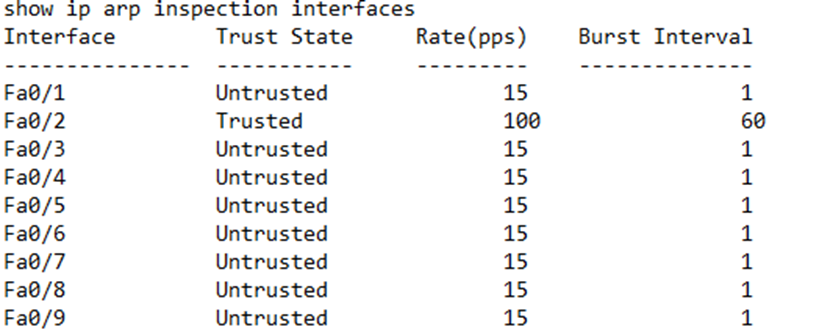
We can check the status of our ARP inspection on each interface by typing show ip arp inspection interfaces. Note that the default rate is 15 messages per second.
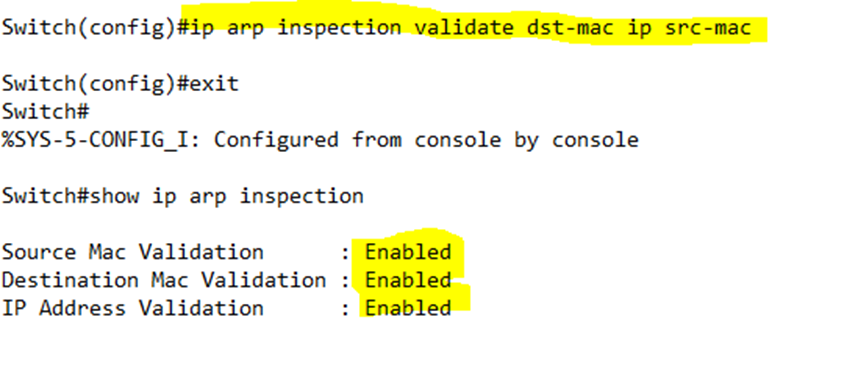
Remember that ARP Inspection validates the ARP message’s sender’s MAC address and IP address. We can also validate its source MAC address, destination MAC address, and/or IP address. We do so by typing ip arp inspection validate <method>, where the method is dst-mac, ip, or src-mac, for destination MAC address, IP address, or source MAC address, respectively.
On the below switch, I have configured all of three methods in the same command. I ran the show command after to verify that all three methods are enabled.
A key feature on a Cisco switch is port security. Remember from the earlier part of this book that each switch remembers the MAC addresses of devices connected to each port. It uses these MAC addresses to forward traffic.
We can use the MAC address table to detect unauthorized devices. If an unauthorized device connects to the switch (as determined by its MAC address), we stop its traffic.
The switch keeps track of the number of unique MAC addresses that it sees on each interface. It also keeps a counter. If the counter exceeds a certain number, it knows that a violation has occurred and turns the port off. For example, if the maximum number of unique MAC addresses is five, and the switch sees six unique devices on a port, it shuts it down.
Port security is activated on a port-by-port basis. Before we can activate port security, we must have manually configured the port to be either an access port or a trunk port.
Remember that we can configure a port mode by typing switchport mode access or switchport mode trunk from the interface configuration.
Once we have configured the mode, we can enable the port security interface configuration by typing switchport port-security.
- We type switchport port-security maximum <number> to set the maximum number of unique MAC addresses that a port can see before activating the security measures.
The port learns MAC addresses of connected devices dynamically and stores them in the MAC address table. To clear the list of MAC addresses that the switch has learned, we must shutdown and no shutdown the port.
If we want the switch to automatically clear MAC addresses of devices that haven’t sent traffic for some time, we type switchport port-security aging time <time in minutes>. The timer is between 0 and 1440 minutes. If a MAC address hasn’t sent traffic in the time specified by the command, it is removed from the list. This gives another new device the opportunity to use the port. - We type switchport port-security mac-address <MAC address> to set specific MAC addresses that are allowed on the port. We can set multiple MAC addresses with this command by typing this command more than once, each time with a different MAC address.
The MAC addresses configured by this command count towards the total number of MAC addresses that the switch will see before activating the security measures. For example, if the maximum number of MAC addresses is five, and we have configured three MAC addresses with this command, the switch will learn two more MAC addresses dynamically. This will happen even if the MAC addresses that we configured do not send any traffic. - We type switchport port-security mac-address sticky so that the switch can remember the MAC addresses that it learned dynamically.
- As soon as we turn this on, the switch will add a switchport port-security mac-address entry for each MAC address that it sees or that it had learned dynamically. This configuration will remain until the switch is rebooted.
- If we set a limit to the number of MAC addresses the switch can learn on that port, then the switch will stop learning MAC addresses after it reaches the limit. If we don’t set a limit, the default is one MAC address.
- This is a useful feature when for example we install a new switch and connect some devices to it. We enable the sticky security and the switch remembers the MAC addresses of the devices connected to each port.
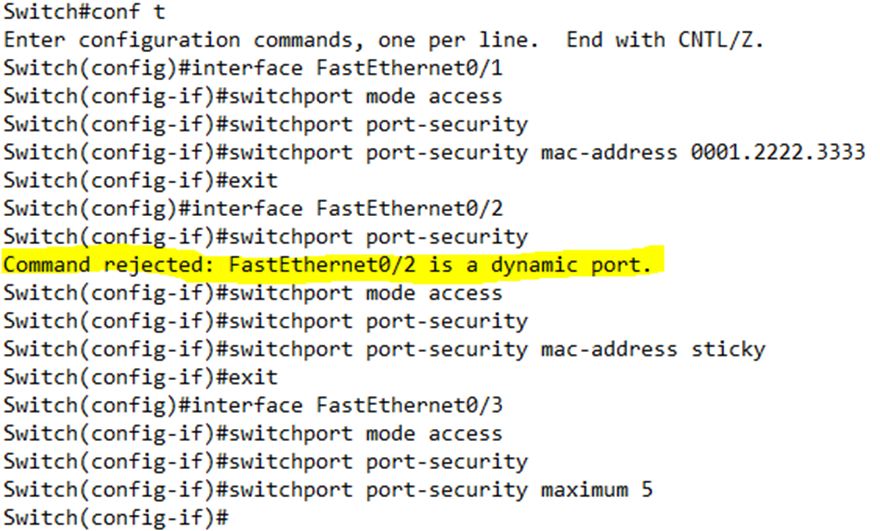
In the above, I set the switch to accept only the MAC address 0001.2222.3333 on Port 0/1. I tried to set port security on Port 0/2, but the switch rejected the command because I didn’t choose whether the port was an access or trunk port. I then set Port 0/2 to have a sticky MAC address. I set Port 0/3 to allow a maximum of 5 MAC addresses.
When we enable security on a port, by default, the switch allows only one MAC address. Port 0/1 will only accept traffic from the one MAC address – the one that we configured.
We type switchport port-security violation <response> to set the action that the switch will take once a security violation is detected on that port. A violation occurs when the switch receives traffic from more MAC addresses than the limit specifies or when it receives traffic from a MAC address that is not permitted.
There are three possible responses
- Protect. Protect drops the traffic in violation and does nothing else. Traffic from permitted MAC addresses continues to flow through the port.
- Restrict. Restrict drops the traffic and keeps a log of the incident. Traffic from permitted MAC addresses continues to flow through the port.
- Shutdown. Shutdown drops the traffic, keeps a log of the incident, and shuts down the port. Now no traffic can get through. The port status changes to “err-disabled”, and the security status changes to “secure-down”. The port will not come back up until we manually shut it down with the shutdown command, and then turn it back on with the no shutdown command.
Having to shutdown and no shutdown ports due to security violations could get annoying, so if we want to avoid it, we can configure the switch to turn the port back on automatically. We type- errdisable recovery cause psecure-violation. This is a global command that applies to all ports and allows the switch to restore the port to functional status after the security shuts it down.
- errdisable recovery interval <time in seconds>. This command tells the switch how much time it should wait before restoring the port.
- errdisable recovery cause dhcp-rate-limit. This command tells the switch to restore the port if the error was caused by the DHCP Snooping.
- errordisable recovery cause arp-inspection. This command tells the switch to restore the port if the error was caused by ARP Inspection.
If we configure port security on a trunk port, we must be careful. A trunk port may see legitimate traffic from dozens or hundreds of MAC addresses. We must configure trunk port security on each individual VLAN within the trunk port. This is beyond the scope of the CCNA, but to enter the VLAN sub-sub configuration, first enter the interface configuration, and then type vlan-range <VLAN number or range>. Then configure the port security commands as before.
If we configure port security on an EtherChannel, we should do so on the EtherChannel interface, and not the physical interfaces inside the EtherChannel.
We can verify the port security by typing show port-security interface <interface name>. For example, if I want to see the port security on GE0/1, I would type show port-security interface G0/1.
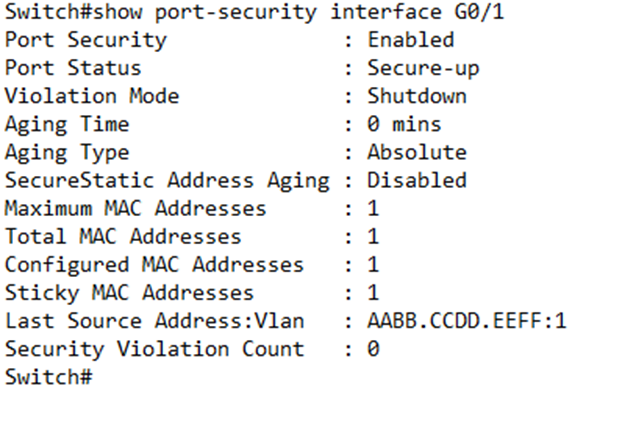
What does this tell us?
- Port Security tells us that the port security is enabled
- Port Status tells us whether the port is operational. If the status was “secure-shutdown”, that would mean that the switch shut the port down due to a security violation.
- Violation mode tells us what the switch plans to do with the port when it detects a violation.
- Maximum MAC addresses tells us what the maximum number of different MAC addresses a switch is willing to see on the port before it determines that a security violation has occurred.
- Sticky Mac Addresses tells us the number of sticky MAC addresses that the switch saw.
- Last Source Address:Vlan tells us the last MAC address that the switch saw on that port and the VLAN that it was on.
- Security Violation Count tells us the number of times that the port has been shut down (if shutdown is the violation mode) or the number of invalid frames received by the port (if restrict is the violation mode). If our violation mode is protect, then the security violation count will remain at zero regardless of the number of violating frames received.
After we have enabled port security, MAC addresses for that port stop appearing in the switch’s MAC address table, even if the switch learned them through the sticky command. To see them, we must type show mac address-table static, instead of show mac address-table dynamic.