
1.2 Compare and contrast the display components of mobile devices.
- Types
- Liquid Crystal Display (LCD)
- In Plane Switching (IPS)
- Twisted Nematic (TN)
- Vertical Alignment (VA)
- Organic Light Emitting Diode (OLED)
- Liquid Crystal Display (LCD)
- Mobile Display Components
- Wi-Fi Antenna Connector / Placement
- Camera / Webcam
- Microphone
- Touch Screen / Digitizer
- Inverter
Types of Screens
- There are two types of laptop/tablet/smartphone screens: LCDs and OLEDs
- LCD or Liquid Crystal Display
- An LCD panel is a glass panel that is filled with liquid. When electricity passes through the liquid, it heats up and changes color.
- An LCD is not bright. It requires a backlight to stay bright. If the backlight fails, the screen will look dim. The presence of the backlight makes the screen thicker.
- There are three types of LCD technology
- TN or Twisted Nematic. Twisted Nematic was the original LCD technology. A TN screen contains molecules that are twisted. When the LCD is off, the molecule allows light to pass through.
Each pixel on the screen contains a bubble filled with liquid, and an electrode. When electricity passes through the molecules in the LCD liquid, those molecules untwist. The larger the voltage, the more untwisted the molecules get, and the less light that is allowed to pass through. We can vary the voltage to get different shades of grey (from completely clear to completely black).
The problem with TN technology is that it only produces images in grey scale. The other disadvantage is that it is difficult to view an image at an angle. You must be standing directly in front of the LCD screen to view the picture.
Sharp developed a color twisted nematic screen. Each pixel bubble contains a red, green, or blue filter. By combining the different colors, we can produce a wide variety of images. The resolution of the images was low.
TN panels are the cheapest.
- IPS or In Plane Switching. IPS was the second LCD technology. It is like TN, but the electrodes are positioned parallel to the glass.
An IPS screen has a better resolution and viewing angle than a TN screen. An IPS screen is the best technology for gaming but is also the most expensive.
- VA or Vertical Alignment. A VA panel is a hybrid between the TN and the IPS.
The molecules in the VA panels sit perpendicular to the glass. When we apply electricity, the molecules tilt. The more they tilt, the less light they let through, and the darker the pixel appears.
A VA panel has better contrast than an IPS, but the viewing angle is worse. They are cheaper than IPS panels.
When you look closely at an LCD screen, each pixel is three liquid filled bubbles – one that has a red filter, one that has a green filter, and one that has a blue filter. By varying the amount of voltage sent to each bubble, we can combine the red, green, and blue to create any color we want.
- TN or Twisted Nematic. Twisted Nematic was the original LCD technology. A TN screen contains molecules that are twisted. When the LCD is off, the molecule allows light to pass through.
- An LCD panel is a glass panel that is filled with liquid. When electricity passes through the liquid, it heats up and changes color.
- OLED or Organic Light Emitting Diode
- An OLED is a more advanced screen technology. It consists of an organic compound (a chemical containing carbon) sandwiched between two layers of foil. When we apply an electric current to the organic compound, it generates light.
- Each pixel consists of a compound that emits a blue light, a compound that emits a green light, and a compound that emits a red light. By applying current to each of the compounds, we can vary the amount of red, green, and blue light emitted to generate any color we want.
- OLED panels were developed after many years of research.
- OLED panels are brighter than LED panels and do not require a backlight. The lack of a backlight allows us to display a wider range of colors and makes the panels thinner and lighter.
- The biggest problem with OLEDs is that the colors fade over time. After approximately 1,000 hours, an OLED panel’s brightness will degrade by 10%.
- OLEDs are being used in some phones and monitors as well as televisions.
- An OLED is a more advanced screen technology. It consists of an organic compound (a chemical containing carbon) sandwiched between two layers of foil. When we apply an electric current to the organic compound, it generates light.
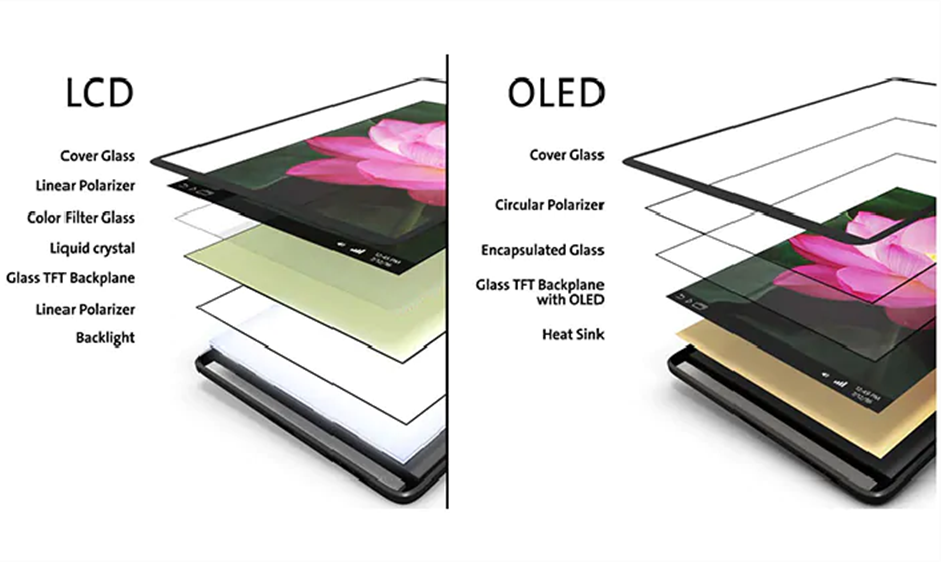
A mobile device display is like a sandwich
- The top layer is a piece of protective glass. Newer phones use Gorilla Glass, which is resistant to scratches and cracks.
- The glass also contains a device called a digitizer. The digitizer’s job is to understand the movements of your finger and translate them into touch. If you crack the glass, then the digitizer will not work.
- The glass also contains a device called a digitizer. The digitizer’s job is to understand the movements of your finger and translate them into touch. If you crack the glass, then the digitizer will not work.
- Underneath is a polarizer. The polarizer filters the light that comes out of the LCD to sharpen the image. The polarizer only allows light to pass if it is heading in a specific direction.
- Below the polarizer is a filter.
- Below the filter is an OLED or LCD, which produces the image.
- At the bottom of the LCD sandwich is a backlight. The backlight shines through the LCD to produce an image. At the bottom of the OLED is a heat sink, which absorbs heat generated by the phone. The heat sink is necessary because excessive heat damages the OLED.
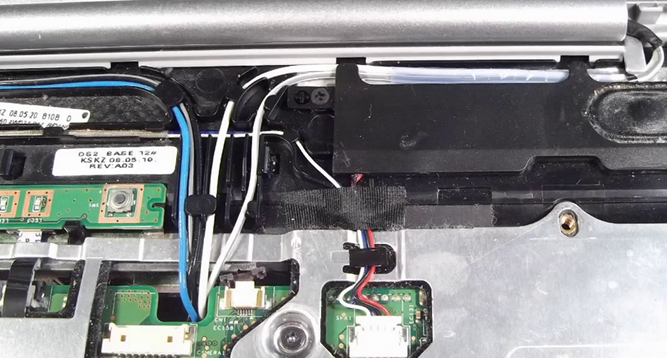
Wi-Fi Antenna Connector / Placement
Great care is taken to install the antennas in a way that allows them to pick up the best signal. Laptop antennas start at the Wi-Fi card and are routed through the laptop hinges and into the screen assembly.
To replace the Wi-Fi antenna
- Remove the laptop bottom access panel
- Disconnect the antenna from the Wi-Fi card
- Remove the bottom or top cover
- Remove the screen bezel
- Remove the antenna cable
- Reinstall the antenna cable
- Route the antenna through the hinge
- Connect the antenna to the Wi-Fi card
- Reinstall the bezel and covers

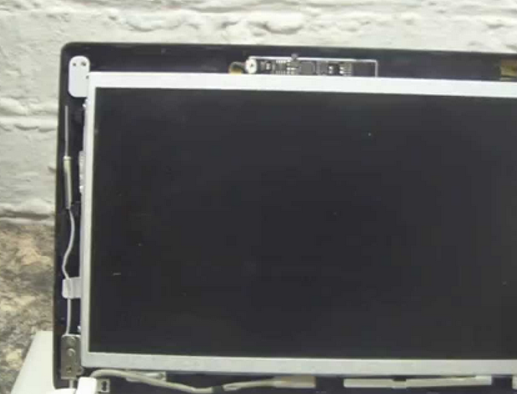
Webcam Replacement
- Typically, the webcam sits at the top of the screen and is part of a circuit board that contains the microphone
- The webcam cable is routed through the hinge and connects to the system board
- Remove the top or bottom cover and access panels
- Remove the bezel
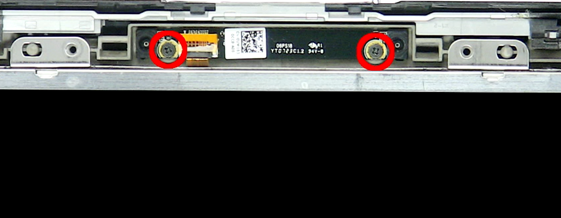
- Remove the web cam cable
- Remove the web cam from the top cover. You may have to remove some screws.
- Install the new camera.
- Route the cable through the hinge and into the system board.
- Reinstall the bezel and covers.
Microphone
- The laptop microphone and webcam are usually connected to the same circuit board
- You can replace the microphone by following the steps for replacing the webcam
Inverter
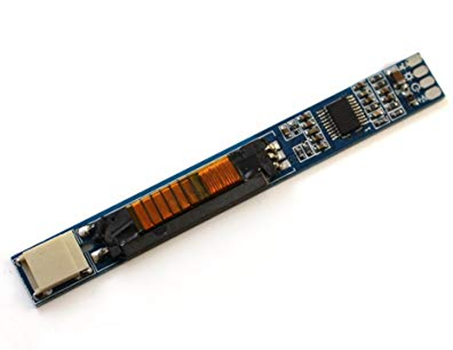
- The inverter provides backlight for the LCD
- It is only found on LCD screens, not OLED screens
- Determine if the inverter is part of the LCD, or if it can be replaced separately. Sometimes, the inverter cannot be replaced.
- The inverter is located underneath the LCD, or at the bottom of the LCD
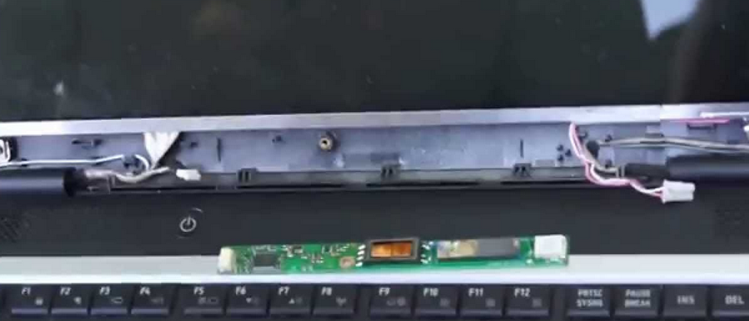
- To replace the Inverter
- Remove the bezel
- Remove the cables connecting the inverter to the system board and to the LCD
- Unscrew the inverter from the laptop
- Install the new inverter
- Reconnect the cables to the inverter
- Reinstall the bezel
- Remove the bezel
Digitizer
- The digitizer is a pane of glass that covers the laptop screen and provides touch capabilities
- It is connected via a cable to the system board
- Laptop screens with touch capabilities have a more solid feeling screen
- An impact to the laptop could crack the digitizer which will affect touch screen capabilities
- To replace the digitizer, first determine if the digitizer can be removed
- Most digitizers are glued to the LCD/OLED panel, in which case the entire screen (LCD and digitizer) must be replaced
- You can try to melt the glue with a heat gun
- If you’re not careful, you could cook the LCD/OLED panel
- You could also crack the glass digitizer or the underlying LCD / OLED panel
- If you’re not careful, you could cook the LCD/OLED panel
- Most digitizers are glued to the LCD/OLED panel, in which case the entire screen (LCD and digitizer) must be replaced
- Laptops with digitizers typically don’t have bezels
- To replace the digitizer
- Remove the top or bottom cover
- Remove the screws which may be covered by black stickers, or remove the screen with a spudger
- Disconnect the digitizer cable from the system board
- If the digitizer and LCD are glued together, it’s possible to remove the glue by melting it with a heat gun
- Install the new digitizer
- Reconnect the digitizer cable to the system board
- Install the LCD assembly
- Reinstall the top or bottom cover
- Remove the top or bottom cover