1.6 Given a scenario, configure Microsoft Windows networking features on a client/desktop
- Workgroup vs. Domain Setup
- Shared Resources
- Printers
- File Servers
- Mapped Drives
- Local OS Firewall Settings
- Application Restrictions and Exceptions
- Configuration
- Client Network Configuration
- Internet Protocol (IP) Addressing Scheme
- Domain Name System (DNS) Settings
- Subnet Mask
- Gateway
- Static vs Dynamic
- Establish Network Connections
- Virtual Private Network (VPN)
- Wireless
- Wired
- Wireless Wide Area Network (WWAN)
- Proxy Settings
- Public Network vs Private Network
- File Explorer Navigation – Network Paths
- Metered Connections and Limitations
Let’s take a closer look at our network configuration.
First, we must connect our computer to a network
- How will our computer connect to the internet? There are three options
- Wireless. We need to know the SSID (the name of the Wi-Fi network) and the password. We must select the correct SSID and enter the correct password.
- Wired. We should connect our computer to an ethernet port.
- WWAN or Wireless Wide Area Network. We must install a SIM card in our laptop to connect to a cellular network.
We can set our network to be “metered”. This tells Windows to reduce the amount of data that is sent and received. For example, Windows won’t download any updates.
- Wireless. We need to know the SSID (the name of the Wi-Fi network) and the password. We must select the correct SSID and enter the correct password.
- Is our computer going to receive an IP address via DHCP or should we set a static IP? Will the network provide a DNS (Domain Name Server) address? Are we using IPv4 or IPv6? We discussed IP addresses in a previous section.
- If our computer will receive an IP address via DHCP, it will do so automatically. DHCP may provide the DNS server addresses, or we may want to specify them manually.
- If we are using a static IP address, then we must know
- The IP address
- The subnet mask
- The gateway
- DNS Server addresses
- The IP address
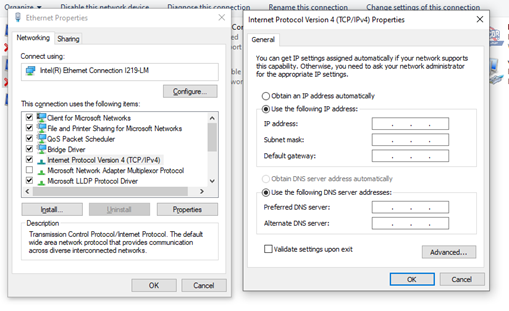
- Visit the network adapter settings and select the adapter that you want to modify. Choose Internet Properties, then choose either Internet Protocol Version 4 or Internet Protocol Version 6.
- If the IP addressing will be DHCP, ensure that the “Obtain an IP address automatically” option is selected.
- If the IP addressing will be static, choose the “Use the following IP address” option and enter the correct settings.
- Enter the DHCP server addresses if required.
- If our computer will receive an IP address via DHCP, it will do so automatically. DHCP may provide the DNS server addresses, or we may want to specify them manually.

- Do we want to connect to a VPN? We might install a special VPN application such as the Cisco AnyConnect VPN, or we might use the default Windows VPN. A VPN lets our computer act like it is directly connected to our organization’s network, even if we are working from home or on the road.

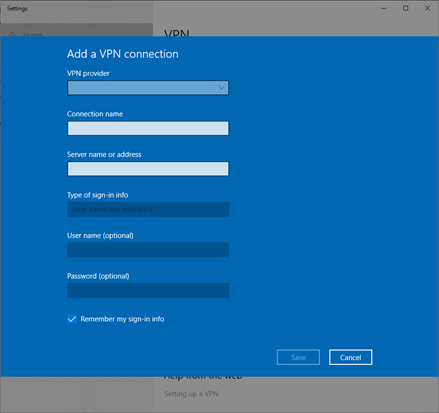
- Visit the VPN connections page in Windows Options. Enter the following
- The type of VPN that you have
- The name of the connection
- The IP address of the VPN server
- The username and password
- The type of VPN that you have
- Do we want to join a domain or a workgroup?
- If we have a local network without a domain controller server, we might join a workgroup.
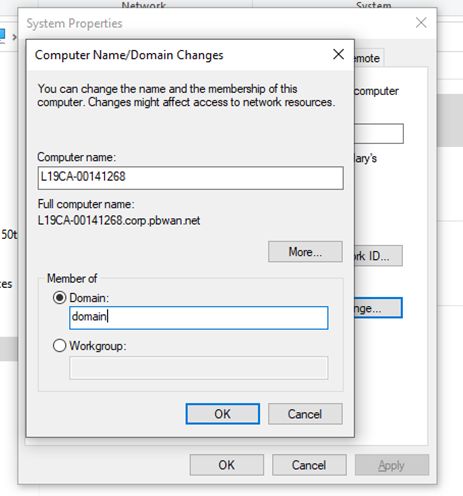
- If we have a domain, we can add our computer to the domain. We must have credentials to join the domain. Visit the System Properties dialog and enter the correct credentials.
- If we have a local network without a domain controller server, we might join a workgroup.

- When connected to a domain or workgroup, we can share printers and files
- On a workgroup, you can add a shared printer by opening Windows Explorer and choosing the Network option. Windows will show you printers that are shared on your network.
- If your printer is connected to the network, you can also add a printer from the Devices & Printers option.
- You can map a network drive from This PC. Choose the Map Network Drive Option. Enter the correct Drive letter and network address.
- On a workgroup, you can add a shared printer by opening Windows Explorer and choosing the Network option. Windows will show you printers that are shared on your network.

- Configure the firewall
- For each network that you connect to, tell Windows whether it is a public network, home network, or work network.
- Configure how the firewall behaves on each network
- I recommend that you block all incoming connections, and then allow only the connections that you specifically require
- I recommend that you block all incoming connections, and then allow only the connections that you specifically require
- For each network that you connect to, tell Windows whether it is a public network, home network, or work network.
- Set up proxy settings
- If your organization uses a proxy, Windows may detect it automatically
- If not, you must set it up from the Internet Options dialog box
- If your organization uses a proxy, Windows may detect it automatically
